
If you own an older model ATV or dirt bike, you probably don’t have an OEM speedometer that was included from the factory. For some people that may be ok, but if you’re like me, you want to know how fast you’re going down that back road or trail. That is where a quality ATV speedometer comes into play. You have a few options for a speedometer:
Phone speedometer app – uses gps to track your distance traveled over time and gives you real time information on speed. Simple usage but there is the potential that your phone will get ruined!
Aftermarket ATV speedometer – designed and built for an ATV or dirt bike (like the xxx). These brands are a bit more expensive (above $100) but include more features as well.
Bicycle speedometer – A cheap alternative method to getting your real time speed as you ride without the fear of breaking something expensive. Spoiler Alert – This Rocks!
I like to think of myself as a thrifty person so I recently invested in a cheap bike speedometer from eBay and hot wired it to my ATV. Here’s how I did it:
1.Choose Your Speedometer – I purchased a $20 bike speedometer through Amazon.com. I would recommend selecting a wireless unit as it will save you time and effort of running wire to your front or rear tire. I should have listened to my own advice, but I purchased a wired display…
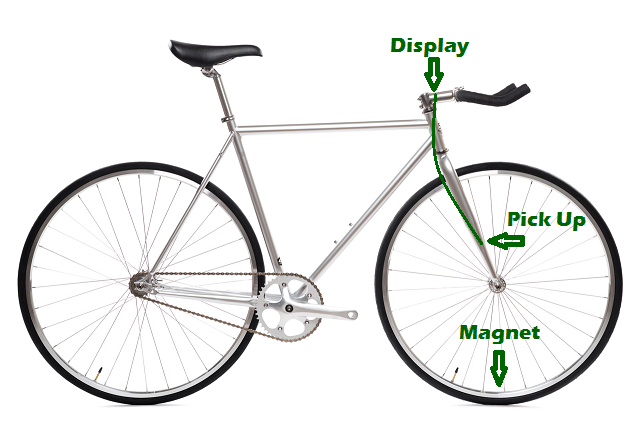
2. Mount the Display – I chose to mount mine to the center of the handlebars, between the steering column brackets. Because the speedometer is designed for a bicycle, most units come with a bracket to attach the display to a 7/8″ handlebar. If you want to get fancy, you can fabricate a dash panel.
3. Mount the Magnet – Pick a location to mount the magnet and receiver. Most speedometers included a magnet with a wing nut on the back which you can use to pinch the spoke of a bike. As my ATV did not have any spokes, I had to look for another area on my atv which also spun with the tires but was not obstructed. The front wheels wouldn’t work because of the location of the brake calipers within the wheel. I was able to use the rear brake caliper to mount the magnet, just inside of the brake caliper, so the magnet could spin freely as the tires turn.
4. Mount the Pick Up Coil – Once you have the location of your magnet, you must attach the pick up coil so that the magnet passes by the coil within a few millimeters during each tire rotation. I was able to zip tie the coil outside of rear swing arm, just above the carrier. It is important to mount the coil as close as possible to ensure the coil can pick up the magnetic field.
5. Run the Wires – Now that the components have been attached, you can run the wires from the pick up back to the display. Stick to areas with little movement to avoid stretching and compressing the wire. I would follow existing wiring and if possible run the wire through heat shielding. Because I mounted my magnet to the swing arm, I had to splice in some wire to extend the distance.
6. Set up the Speedometer – When starting the speedometer for the first time, you will be prompted to enter the tire size or circumference. The display needs this information to convert rotations into distance. As you see below, speed is a function of distance of time. The bike speedometer uses the same formula to calculate your speed on the spot by taking the distance covered during one rotation (tire circumference) and the number of rotations an hour. See formula below:
Wheel Circumference (2TTr) x Rotations per Hour = Speed (MPH)
Example – Assume tire has a diameter of 20″ and completes two rotations every second.
20″ wheel has a circumference of .0009916 miles (2 x 3.14159 x 10″ = 62.83″ / 12″ = 5.236′ / 5280′ = 0.0009916 miles)
Tire completes two rotations per second = 7200 rotations per hour (120 rotations a minute x 60 minutes = 7200)
0.0009916 miles per rotation and 7200 rotations completed in an hour = 7.13952 MPH
As you can see above, the wheel diameter is crucial to calibrating the correct speed of your quad. A mis-measurement by an inch can throw your speedometer off by 4-5 mph at actual speeds of 50mph. My suggestion is measuring your tire with a tape measurer and adding half an inch to account for the enlongation of the tire at higher speeds (tires get taller at high speed).
7. Calibrating the Speedometer – It is likely the speedometer won’t be perfect with it’s reading of your speed. I would suggest testing the accuracy using your phone, a radar gun, or having a friend drive next to you. Once your quad reaches an actual speed of 40 MPH (this is using the speed of the calibration device i.e. friend in car, GPS, etc), take note of the speed which is displayed on your ATV speedometer. If it’s the same, great! If not, it’s time to calibrate. If your radar speed is higher than the reading on your speedometer, the tire size should be adjusted upwards in your settings. Conversely if the radar speed less than the speedometer, you need to reduce the tire size setting.
I was pleased after installing my speedometer using the instructions I created above. The 7th bullet point was added because of an issue I ran into with the speedometer not reading the speed accurately. In the end I had to reset the tire size a bit smaller to display the actual speed I was traveling. I believe this had to do with where I located the pick up and the angle that I mounted it. The magnet passed by the coil parallel which caused a slight delay in the reading. Over all I am completely happy with this idea and saved a considerable amount of money doing so!